


The Complete Guide to Fishfinder Installation: Tips from the Experts
Installing a fishfinder is one of the best upgrades you can make to your boat. Whether you’re a weekend angler chasing snapper in the Bay of Plenty or a game fisherman heading wide for tuna and marlin, a properly installed fishfinder can be the difference between guesswork and pinpoint accuracy.
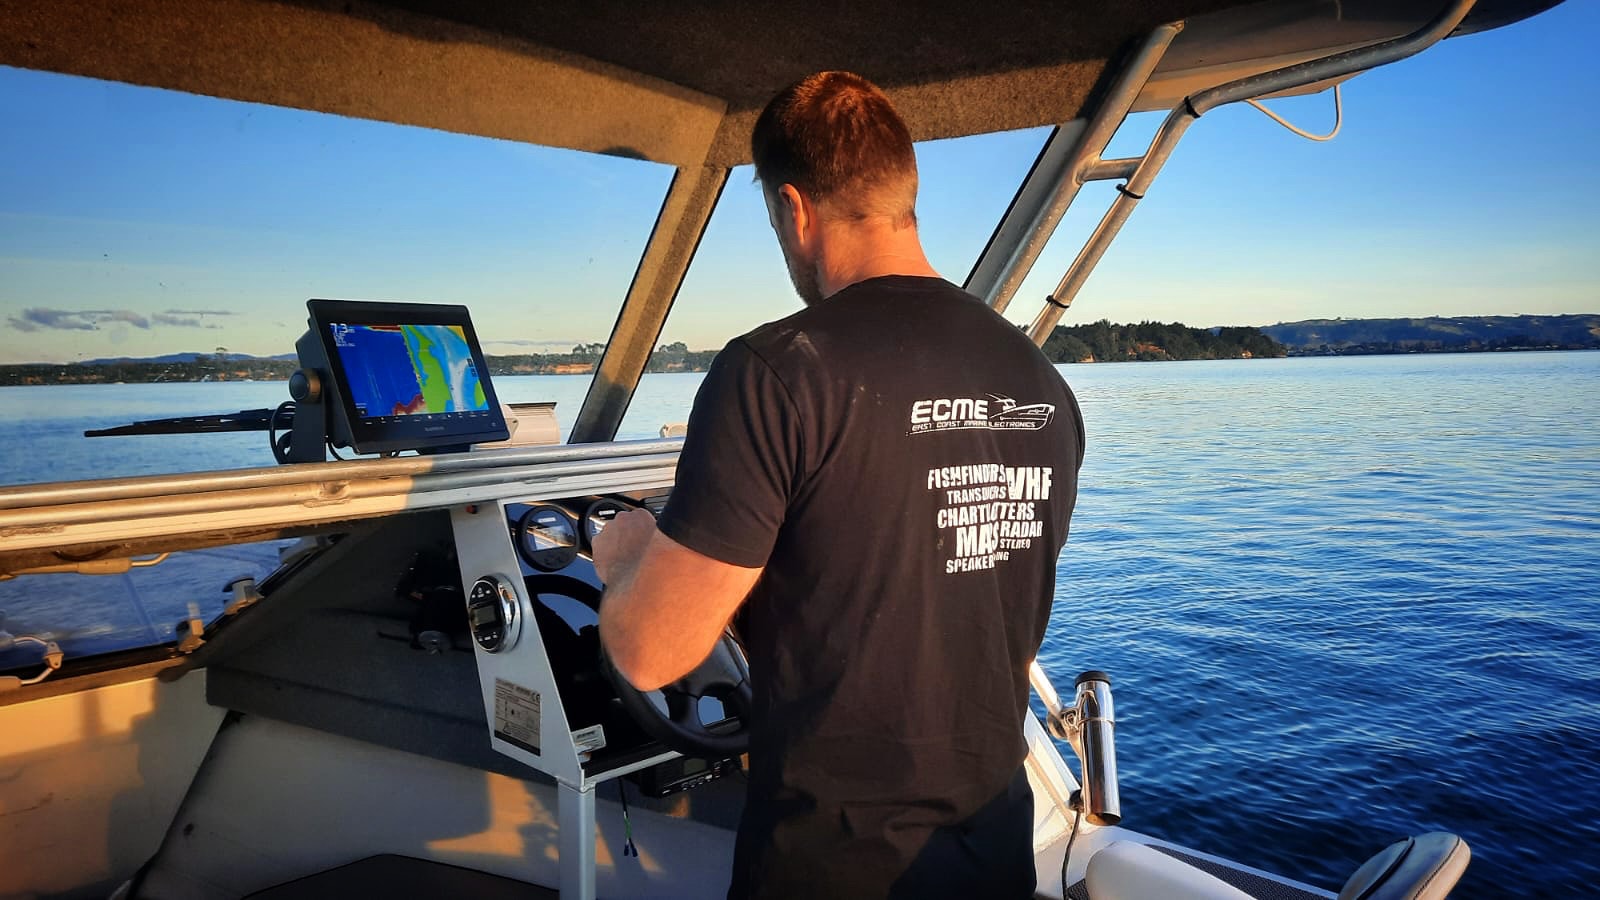
At East Coast Marine Electronics, we’ve installed everything from compact entry-level units to larger systems. In this guide, we’ll walk you through everything you need to know about fishfinder installation, including choosing the right unit, transducer mounting options, wiring tips, and why professional installation can save you time and frustration.
Fishfinder Installation Tauranga: Why a Proper Installation Matters
A fishfinder is only as good as its installation. Even the best unit from Garmin, Simrad, or Lowrance will underperform if the transducer isn’t mounted correctly or if the wiring is messy. Common issues from poor installation include:
-
Interference and noise issues—this issue often arises from improper transducer placement or wiring, making troubleshooting essential for clear sonar readings
-
Inaccurate depth readings and the effect of speed at higher speeds
-
Missed fish arches due to turbulence and water mess around the transducer
-
Shortened equipment life from poorly managed wiring and power setups
That’s why a great installation is key — it ensures you get crisp sonar returns, reliable performance, and a system that lasts for years.
Choosing the Right Fishfinder for Your Boat
Before you even think about installation, you’ll want to make sure you’ve chosen the right type of fishfinder for your style of fishing. Some questions to ask:
-
Where do you fish? Lakes, harbours, and offshore waters demand different sonar ranges.
-
What depths are you targeting? A shallow-water angler chasing snapper in 30m doesn’t need the same transducer as someone dropping jigs in 300m.
-
Are you fishing from a kayak? Kayak anglers have unique installation needs and should consider compact, waterproof units designed specifically for kayaks.
Do you need side imaging or just traditional sonar? SideVü, DownVü, or SideScan are excellent for finding reef edges or schooling fish, helping you find fish more effectively.
Modern fishfinders provide valuable information about underwater structures and fish locations, enhancing your ability to make informed decisions on the water. We recommend considering your fishing environment and target species when selecting a fishfinder to ensure you get the most suitable features for your needs.
👉 Check out our range of Garmin fishfinders, Simrad displays, and the Simrad NSS 4 16” MFD Chartplotter to see which unit suits your fishing style.
The Transducer: The Heart of Your Fishfinder
The transducer is arguably the most critical part of any fishfinder system. It’s the “eyes” of your sonar and where most installation mistakes happen. There are different transducers designed for specific applications, and each is designed to maximize sonar performance. For optimal results, the placement of the transducer should be carefully measured to ensure accurate readings and effective operation.
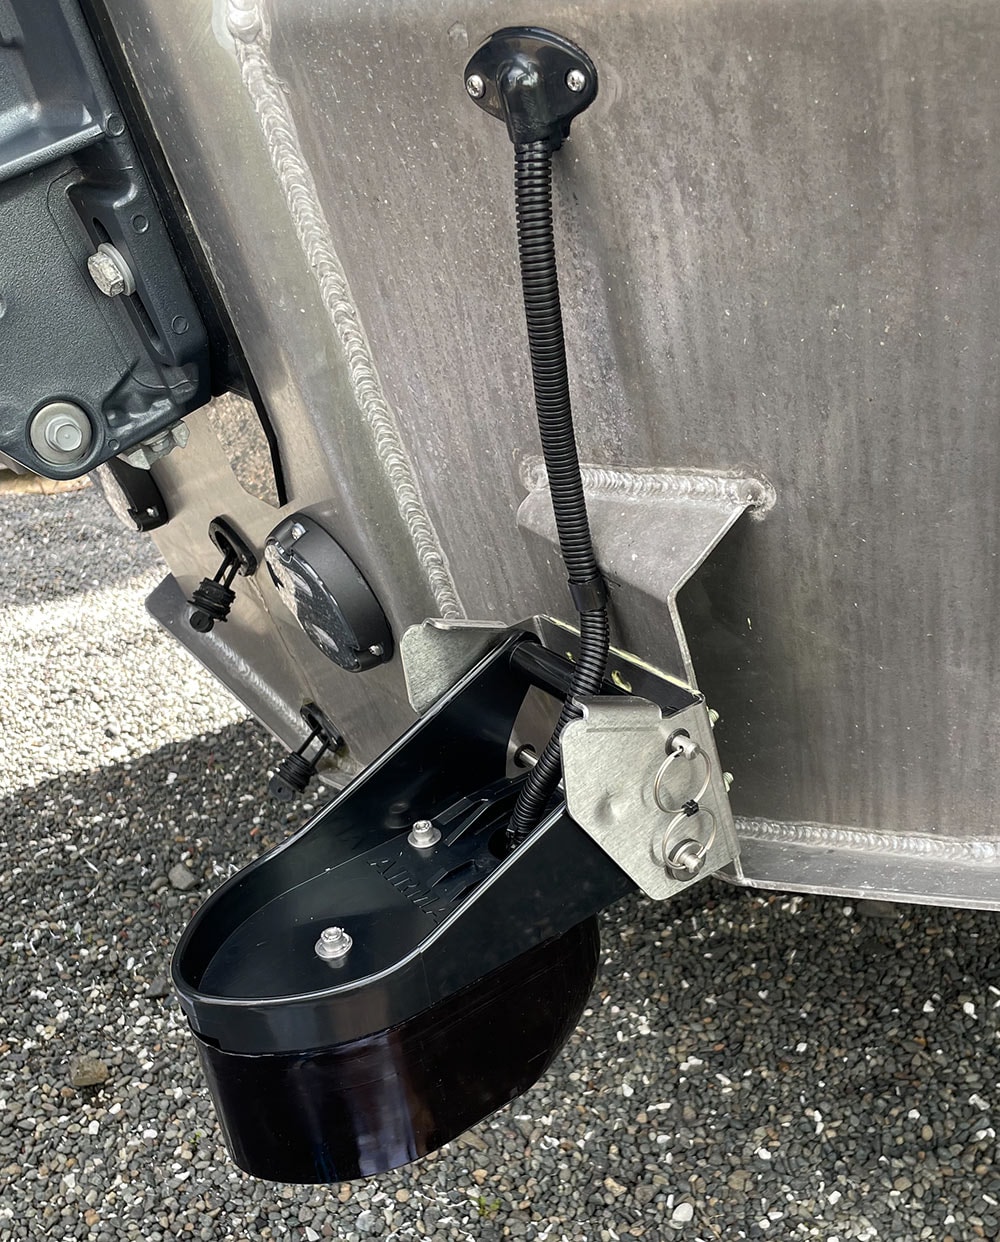
Transducer Mounting Options
-
Transom Mount
-
Most common for small to mid-sized trailer boats
-
Easy to install and adjust
-
Best suited for planing hulls where the transducer can sit just below the waterline
-
Use a ruler to help mark the best place for installation just below the waterline, ensuring the transducer is in line with the hull and oriented toward the boat’s head for optimal performance
-
Thru-Hull Transducer
-
Ideal for larger boats or deep-water fishing
-
Provides the cleanest signal with minimal turbulence
-
Requires cutting a hole in the hull (best left to professionals); ensure the hole is the correct size and is cut precisely
-
In-Hull Transducer
-
Mounted inside the hull and shoots through fiberglass
-
Works only with solid fiberglass hulls (not cored or aluminium)
-
Designed to accommodate different hull types
-
Avoids drag but can slightly reduce sensitivity
-
For kayaks, you can stick the transducer to the inside of the hull using a waterproof adhesive like Selleys All Clear for a secure and reliable mount.
Step-by-Step: Fishfinder Installation Basics
To start the installation process, gather the right tools and materials. While each boat and fishfinder setup is unique, the process can be simple if you follow each step carefully. Generally, the installation involves the following steps:
Make sure to complete all steps for a successful installation.
1. Planning the Install
-
Choose a location on your dash or helm for the display where it’s visible but not obstructive, and ensure the area is carefully measured for proper fit and visibility.
-
Plan where cables will run to keep them tidy and protected.
-
Decide on the best transducer location for your hull design.
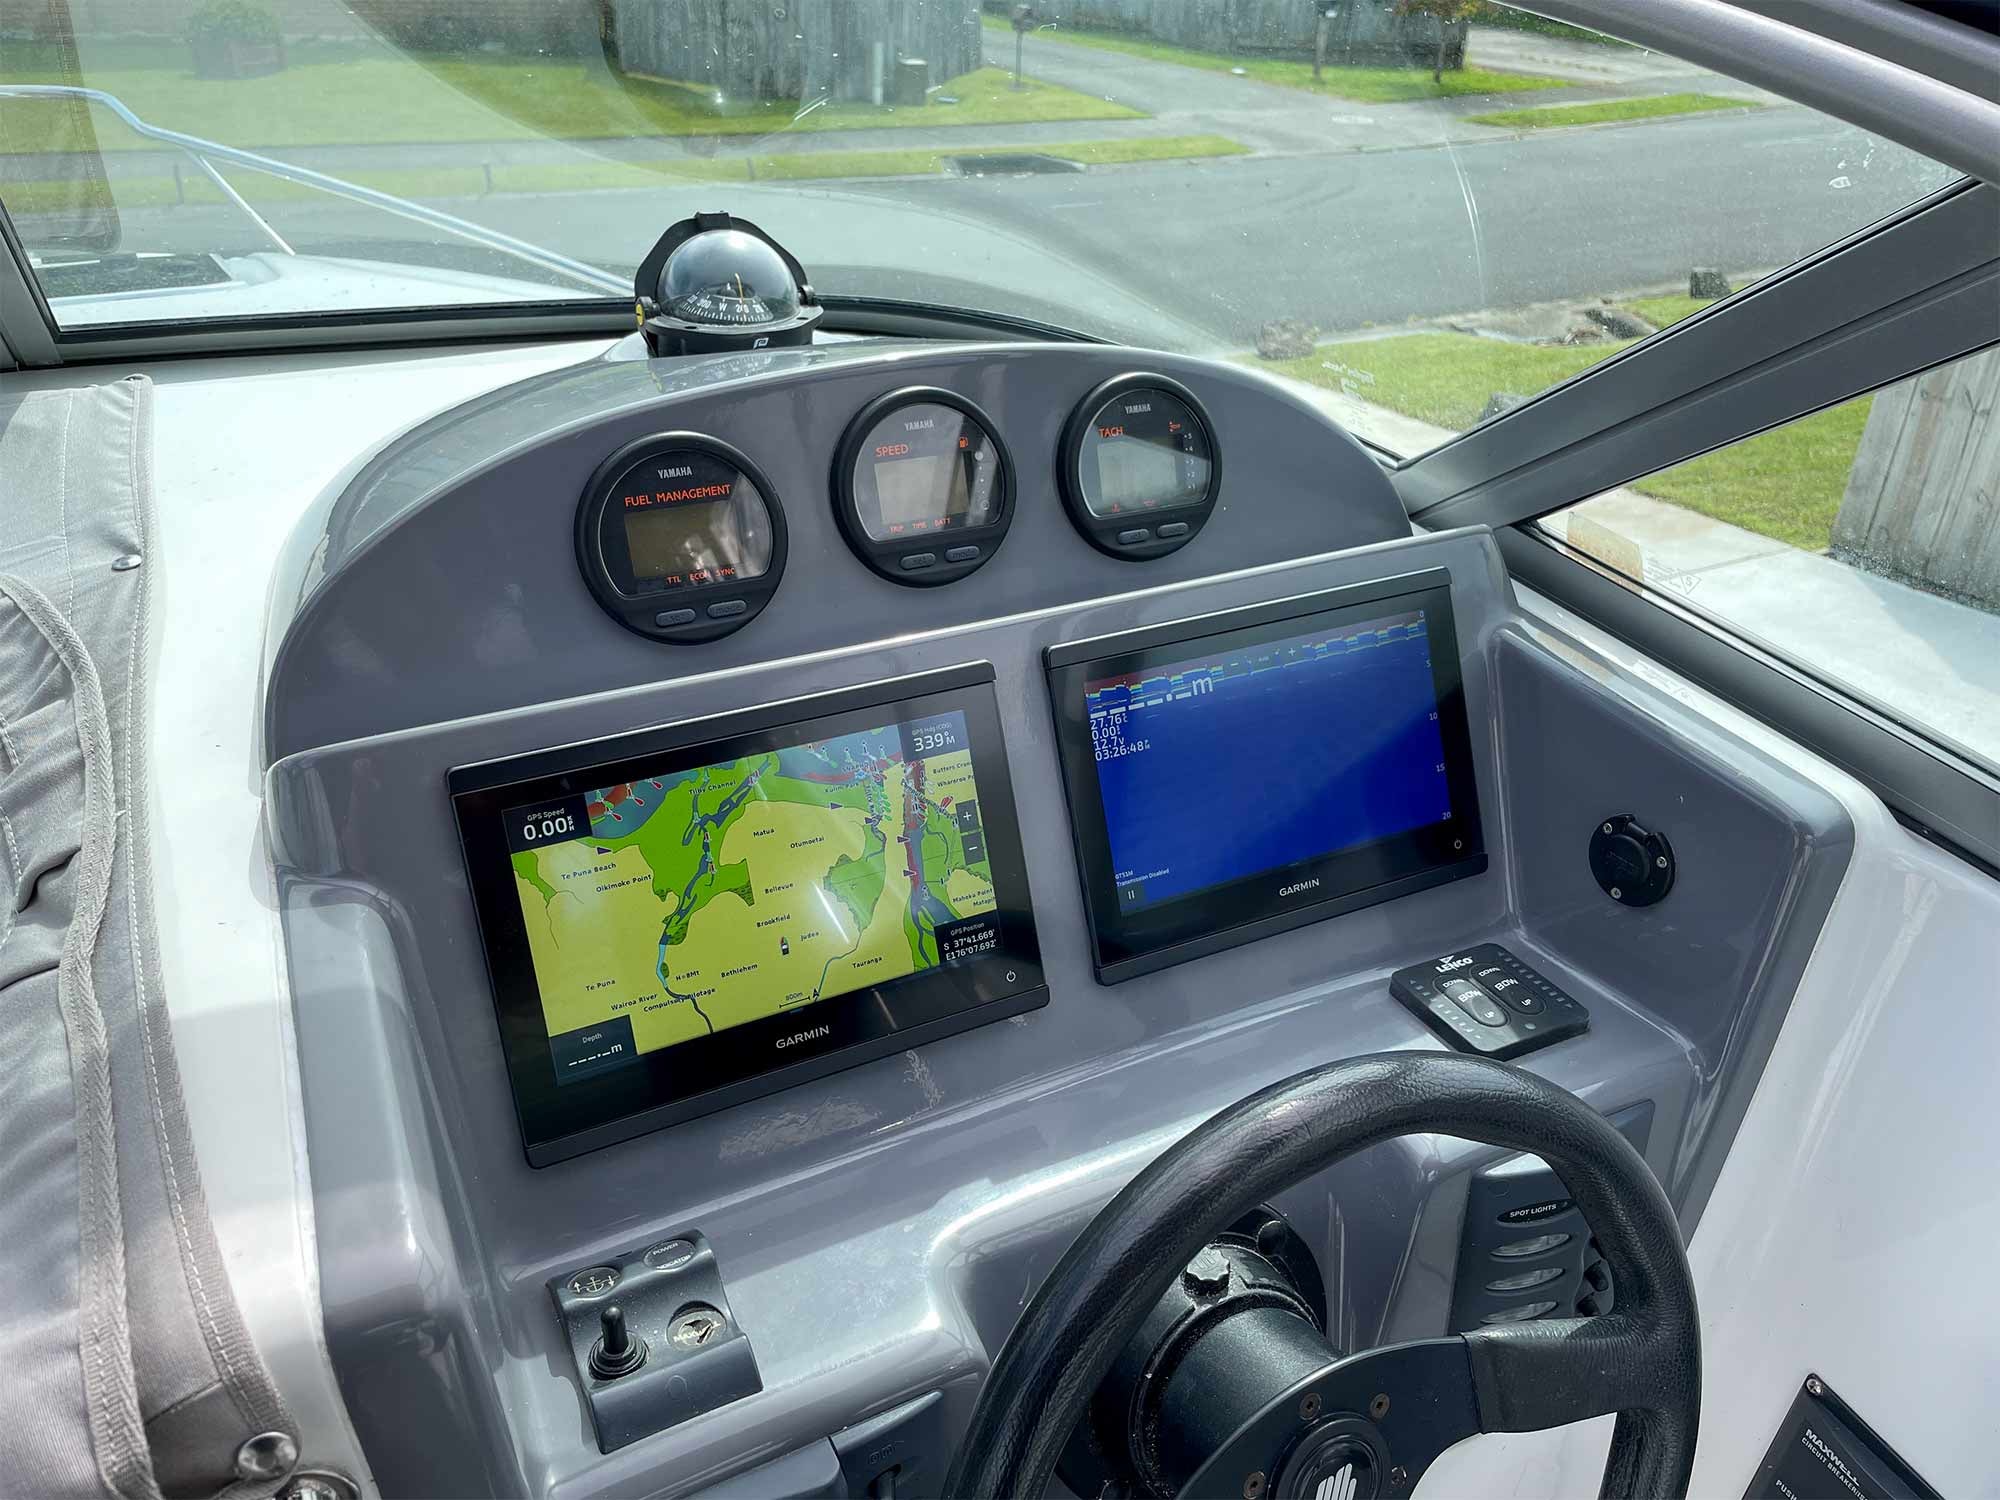
2. Mounting the Display
-
Use a flush mount kit for a clean, factory-style look, or bracket mount if you want flexibility.
-
If using a paper template to mark the holes, be sure to remove the template before drilling.
-
Make sure there’s enough clearance behind the dash for cables.
3. Installing the Transducer
-
For transom mounts, ensure the transducer is below the waterline and parallel to the keel.
-
Avoid mounting too close to strakes, steps, or the propeller wash.
-
For thru-hull units, align carefully with the keel to avoid angled readings.
After installing the transducer, check and fine-tune your fishfinder's settings to optimize performance. Adjusting the transducer position can have a noticeable effect on sonar readings, and making a turn with the boat can have the same effect as raising or lowering the transducer.
4. Running the Cables
-
Use proper marine-grade cable ties and conduits.
-
Keep transducer cables away from VHF and power wires to prevent interference.
-
Avoid sharp bends that can damage cables over time.
-
Inspect and secure all plugs to prevent corrosion and ensure reliable connections.
5. Wiring Power
-
Connect to the power supply with a dedicated fuse. Always check the battery charge level before heading out, and ensure the fuse is the correct rating for safe operation.
-
Avoid piggybacking off existing circuits to reduce the risk of voltage drops.
6. Testing the System
-
Before heading out, power up the unit at the dock or ramp.
-
Check sonar readings at idle and on plane, making sure the fishfinder is giving you accurate readings during testing.
-
Adjust transducer angle if you’re losing bottom lock at speed, and make a turn to see if the transducer maintains bottom lock.
DIY vs Professional Installation
While some boat owners are confident with tools, there are clear benefits to hiring a professional installer like us at East Coast Marine Electronics. A professional can complete the job efficiently and to a high standard, ensuring your marine electronics are installed correctly the first time.
We pride ourselves on delivering exceptional service, including expert customer support, factory-backed warranties, and professional installation. Our hands-on work and expertise guide you through every step of the process, ensuring your equipment functions optimally and meets your specific needs.
DIY Pros:
-
Cost savings on labour
-
Personal satisfaction of doing it yourself
DIY Cons:
-
Risk of drilling in the wrong spot
-
Potential for water leaks from poorly sealed holes
-
Increased chance of electrical interference
-
Voided warranties if incorrectly installed
Professional Installation Benefits:
-
Correct placement the first time
-
Clean wiring and cable management
-
Knowledge of best practices for different hulls and setups
-
Calibration and testing to ensure peak performance
👉 If you’re in the Bay of Plenty, Coromandel, or Rotorua, contact us for mobile installation services. We come to you, saving the hassle of towing your boat anywhere.
Common Fishfinder Installation Mistakes
We’ve seen plenty of installs gone wrong. Here are some pitfalls to avoid:
-
Mounting the transducer too high or low → causes turbulence and poor readings
-
Running cables alongside engine wires → introduces electrical noise
-
Not sealing holes properly → leads to water ingress and rot
-
Using household connectors instead of marine-grade heat-shrink terminals
If you are unsure about any installation step, it's best to seek professional assistance to ensure optimal performance and avoid common issues.
Advanced Tips for Better Performance
If you really want to get the most from your fishfinder, consider these upgrades:
-
Use a Dedicated House Battery
Keeps your electronics stable without interference from engine cranking, and can assist in maintaining consistent power for optimal device performance.
Upgrade Your Transducer
A high-power CHIRP transducer like the Garmin TM275LHW provides incredible clarity at depth. For added protection, use protective covers or coatings to safeguard your transducer and electronics from water ingress, salt corrosion, and physical damage.
-
Regularly Update Software
Manufacturers frequently release updates for sonar performance and mapping.
For additional guidance, consider watching an installation video to help you through the setup process.
After each fishing trip, store your fishfinder and other electronics at home in a dry, secure place. This helps protect your devices from moisture and extends their lifespan.
Final Thoughts
A fishfinder is one of the most valuable tools on your boat — but only if it’s installed correctly. Proper installation is crucial for all types of vessels, including pleasure boats and game fishers. From planning and transducer placement to wiring and testing, every step matters.
At East Coast Marine Electronics, we’ve helped countless boat owners unlock the full potential of their gear with expert installation. We proudly serve customers in various areas across the region. Whether you’re running a small tinny, a family cruiser or a serious offshore weapon, we can supply, fit, and calibrate the perfect setup for your needs.
👉 Browse our online store for the latest fishfinders and accessories, or get in touch to book a professional installation.
In short, the best way to get the most from your electronics is with professional installation and support. With the right install, your sounder or fish finder becomes more than just a screen — it’s your underwater vision and transforms your fishing experience.


